TUTORIAIS ------
March 13, 2008 |
 |
I've made a few
quick pose tests and rendered out some "marble" renders. The
basemesh was rigged in max using Character Studio and once I had the
pose ready, I exported it to an OBJ and imported it into Mudbox as a
"layer". The "Import as Layer" is another cool feature that really
helps you sculpt regions that are otherwise inaccessible in a
particular pose. For example, I opened up his mouth in the basemesh,
imported it as a new layer and detailed the mouth.
As for the
"Marble Renders", they were basically simple VRay renders [Standard
White Material] with some postprocess in
photoshop.

Texturing the
Body
Before I started the
texturing I chose a green color scheme that I liked a lot from a
T-Rex sculpt. I wanted to have a blend between human and reptile
skin and also wanted to tryout the SSS Skin shaders this
time.
I took
my NormalMap [which I had generated from Mudbox] and used it as a
baselayer in Photoshop to work on. I had many versions of the
texture and it was initially all out of place as I had no clue where
I was going with the textures/Skin Shader. Thats when I was
suggested to do a rough paint over of what I wanted over one of the
mudbox screencaps [Thanks to Heber!]. It was really helpful as I got
a clear picture of how my final texture would look like. I made a
dark green color scheme with tattoos and stuff going on, but I had
to scrap it at the last minute as I lost control over my diffuse
texture....I didn't organize my layers well in Photoshop and it
proved to be expensive. So I've scrapped it and started all over,
this time with an organized set of layers that gave me full contorl
over all the elements of his texture. I've also based off the Skin
Shader on Marc Mordlet's excellent VRay Skin material. The bump map
included my normal map and an additional bump which had a tiling
skin detail it. The specular map was based off my Color map.
Basically it was the inverted color map with a lot of dodging and
burning in photoshop.
I was finally happy with the body
textures when I got it to look like what I imagined it to
be.

Texturing the
ArmorBefore starting on
texturing the armor, I had the basic color scheme knocked in. I
wanted an "Egyptian" feel to the textures, so it was mostly brown. I
chose to have a dragon-hide/leathery organic armor. No metal. I also
wanted some glowing runes over his armor to break the otherwise
plain feel. I couldnt get the runes properly in max, so I chose to
do it in postprocess.
Many people felt that my texture job
didn't do justice to the modeling. But at the end of it I was happy
with what I've learnt along the way and with what I've got for a
final texture. I'll surely try to improve upon this in my future
projects. This is also the reason why I'm not going very deep with
this part of the walkthrough.Posing, Lighting and RenderingI wanted to convey the emotion of a warrior thinking
about his battles...and it was hard. I had to go through many poses
before I finally settled for this one. I've used the same pose in
both the composites.
For the lighting, I've used 3 Vray
lights [for the Key, Bounce and Rim lights]. My friends Dan and
Jignesh really helped me get a better idea about lighting a
scene.
The renders were made with the "Medium" setting of
VRay's Irradiance Map, everything else was at
defaults. CompositingI
wanted a Blizzard-esque feel for my final scenes. The first
background was my first attempt at making a matte and the 2nd
background is an actual photograph taken by Allan aka
deviantanonymous from Deviantart. CompositingI
wanted a Blizzard-esque feel for my final scenes. The first
background was my first attempt at making a matte and the 2nd
background is an actual photograph taken by Allan aka
deviantanonymous from Deviantart.
The post-process basically
involved some hue shifts and quite a bit of touchups in photoshop.
When I've made the blue toned variation [it was inspired by 300] I
really liked it as it conveyed the mood I hoped to get for a final
render. And that was when I called it done. Final Renders
Final Renders  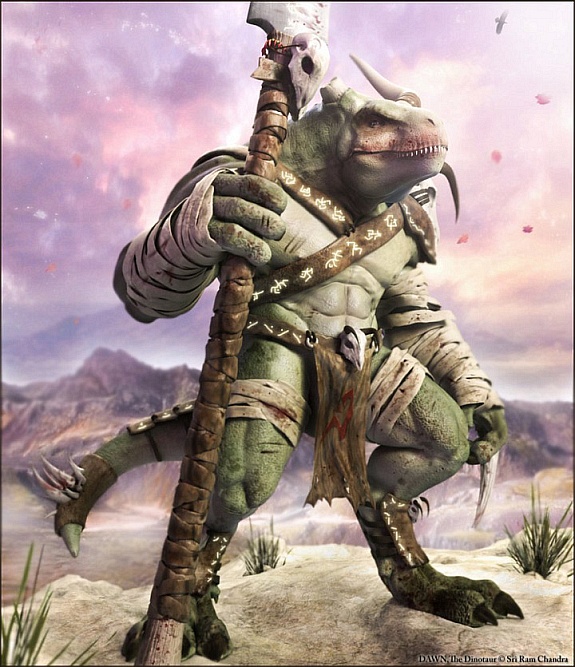
| |

