 Concept Concept
Character: This project
started out as an anatomy study. I didn't feel like making a
standard human, and wanted to make something interesting...something
that'll keep me hooked to the project. So, I decided to make
something that I can relate to, and thus started my first attempt at
creating a new character design. I've studied a lot of existing
concepts and sculpts for inspiration, and I've always been
fascinated by Blizzard Entertainment's Artwork. Tauren Shaman from
the World of Warcraft and the Minotaur by Aaron St. Goddard totally
inspired me to create a character that is part human and part
animal. The human part was there so that I can study human anatomy,
and the animal part is to keep me hooked ;) I had to choose the
'animal' part of the character. I'm crazy about Dinosaurs, so it
wasn't hard. But I didn't want a simple 'Dinosaur Man',so I added in
the Minotaur bit which inspired me in the first place and thats how
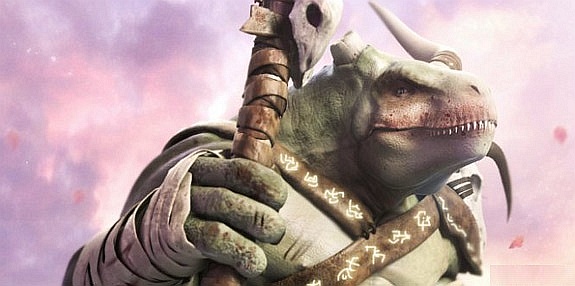
the 'Dinotaur' was born. Dinotaur or more precisely 'Dinotavr'
translates to "Bull of the Dinos". So, I wanted to capture the feel
of a strong Warrior, instead of going in the 'scary monster'
route.
Armor: Again, a lot of Blizzard inspired stuff here ;) But I
added in a few more things that I love : Samurai Armor Design and a
bit of Dinosaur armor too, for example the spikes on the tail were
based off a Stegosaur, and the claws on his left hand were added for
the 'T-Rex' feel.
* For those who wish to know whatsup with
the "Dawn" thing: I wanted to get back to basics and start anew. I
had no idea what I'd be making, so the project was codenamed 'Dawn'
to reflect my desire. Even after I'd finalised my 'Dinotaur' design,
I didn't feel like dumping the 'Dawn' from the name...So I named him
'Dawn', though it doesn't sound like the name of a warrior, it just
had to be it.
Modeling the
Body
This was the most exciting
part of my project. I was deeply inspired by Kolby Jukes's attention
to detail, and I wanted to make my Dinotaur as muscular and organic
as I could. This was my anatomy study and I spent a lot of time on
studying the human form before I started
sculpting.
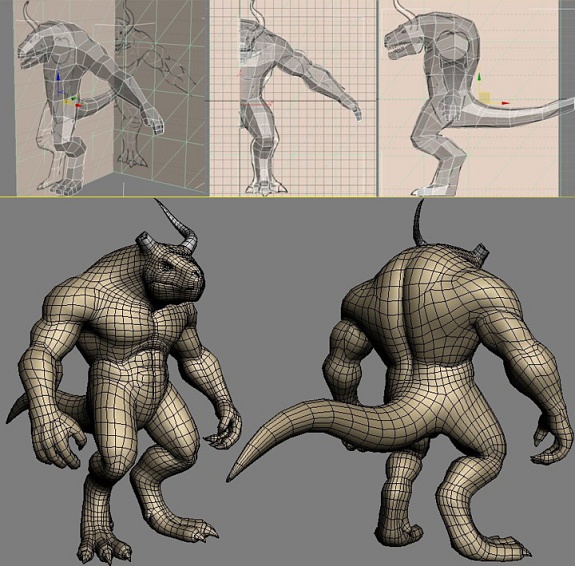
I started blocking out the model in 3ds max using the
box-modeling technique. I basically put the major forms and the
overall proportions in this stage. I had 2 image planes with
sketches of the silhouette I wanted. I found that using the DirectX
shader will give crisp image quality on the planes.
Once I
had the blockout in place, I started subdividing to add more form to
the mesh. I wanted a moderately dense basemesh without any of the
minor details. I spent quite a bit on getting a good meshflow and
found it to be very important for a basemesh. I've tried to keep
triangles and 5-sided polygons to the minimum as they would cause
distortion later in the sculpt. I found the "Relax" brush in max to
be very helpful in cleaningup and spacing the edgeflow for an even
topology. The final basemesh turnedout to be roughly 10k triangles.
I've unwrapped the mesh using Pelt Mapping in max and exported it to
OBJ. I double checked my Pivot in max to make sure that its at the
absolute center.
At the end of
it, I had the basemesh ready for detailing in a sculpting app, in
this case, Mudbox.
Sculpt
Understanding
the forms lying underneath the skin and how they relate to each
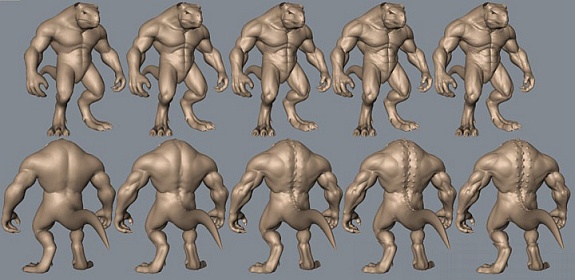
other is what you should be stressing on.Level 0: I've imported my
basemesh into Mudbox and turned on the X-Symmetry. I spent time on
refining the forms and fixing a few proportions. The "Bulge" tool
with a low strength helped with the form refinement, and the "Move"
tool is the best for fixing minor proportion issues.
Once I'm
completely satisfied with the overall form, its time to subdivide
to Level 1.Level 1: The focus in this division was on getting into the
forms developed in the previous level. I had enough polys to hint at
the details of each of the individual forms. A lot of time was spent
in this division and again I've used the Bulge Brush [along with the
Smooth brush] to bring out the forms. Feel free to smooth out a form
and refine it if you feel that it didn't turnout well. You can also
use the Move tool with a low intensity to move some muscle
definition.
At the end of it, I had all the muscles well
defined to an extent possible at the current level, its time to
make the forms crisper and more organic, so onto the next
level.Level 2: All of a sudden I've got a LOT of polys to handle.
Focus, was again on developing the forms. This time I got enough
geometry to addin minor muscles, some subtle, major veins on the
neck and the arms and in general more detail to each of the
individual forms, and faint muscle striations connecting these
forms. I've used the "Curves" in Mudbox to define each of the
muscles separately and found it good for poppingout smooth curves
that makeup each muscle [which I later smoothed up to the extent
that they are very subtle]. I also found the "Pinch Brush" to be a
great tool for making the forms crisper. Pinching around the forms
really helps them standout better, and adds to the 'organic' feel.
Once I'm happy, I divided to start on the actual
detailing.Level 3: At this stage,I had all the forms in place.No more
changes to the major forms/proportions. I started with the
detailing. At this level I've found the "layers" feature in Mudbox
to be of immense help. I could put all the veins on one layer, crisp
bony detail on another,and more minor muscle striations on another
etc. And the best part is the ability to control the Transparency of
these layers,I could choose how prominent I want the veins to be by
playing with the slider.Level
4: I'm pretty much done with sculpting
my model. This stage was mostly about removing the symmetry and
adding more, very subtle details. I've disabled the X-Symmetry, and
started using the Move tool to randomly move the forms [very subtle
again; I went a division or two lower for more control]...and added
in a few asymmetric details all over. The muscle striations were
pinched upon to make them look "tighter" and I've added more detail
on the face, and the back [the horny detail]. I've also added subtle
details like the nipples, cuts on his nails and very minor details
even at places that are hard to notice in the standard
views.Level 5: This is where the scaly reptilian skin details go.
I've mostly used aplhas of reptile skin as Stencils for detailing.
Again its great to be able to add the detail on separate layers.
I've saved some tiling skin detail for later [in the texture]. Once
done with the modeling, I've generated the NormalsMap and
DispalcementMap from Mudbox [default settings].
It was time
to start on the armour. I took screencaps of the Front and Side
views,and painted over the armor design in photoshop for a clear
picture.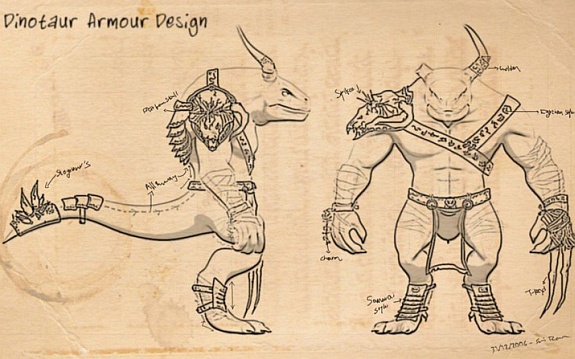 Armor Armor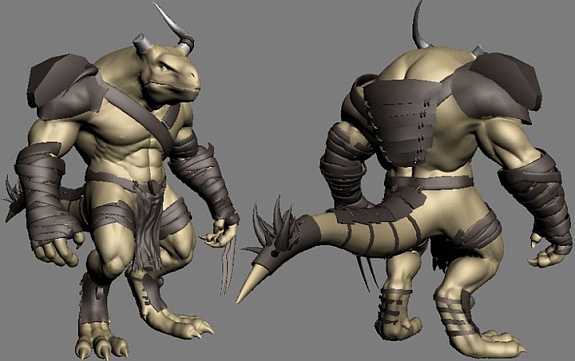
Sculpt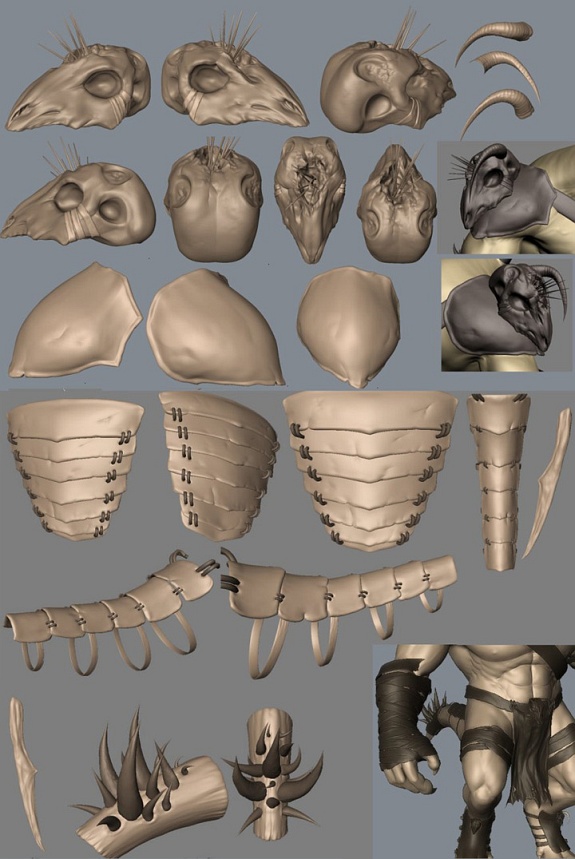 Once I had the armor pieces
blocked out, I started sculpting the details one piece at a
time. Once I had the armor pieces
blocked out, I started sculpting the details one piece at a
time.
I started with the skull, then moved on to his belts,
the loin cloth, armor plates, horns and finally the wraps. Again,
layering in Mudbox proved to be priceless here. And more pinching
for crisp cuts/dents in the details. I've also added in some spikes
in the skull [very lowpoly cones] and belts to hold the skull to the
shoulder plate [polyboost again].
Weapons I made 2 weapons for him. A
pike and a big sword. Both of them carried the theme from his armor
but I chose to scrap his sword as it just didn't seem to go well.
Again the wraps were made using polyboost. The weapons themselves
were box modeled. Once done with the blockout, I've detailed the
weapons in the same way I did the armor. I made 2 weapons for him. A
pike and a big sword. Both of them carried the theme from his armor
but I chose to scrap his sword as it just didn't seem to go well.
Again the wraps were made using polyboost. The weapons themselves
were box modeled. Once done with the blockout, I've detailed the
weapons in the same way I did the armor.
Once I'd finished
detailing the weapons, I spent some tweaking the whole character,
and when I was finally happy it was time to call the modeling
done. |
|


